what parts to keep on hand for your furnace
3 Easy Furnace Repairs
Updated: Feb. 17, 2022
… And 2 repairs to avoid
Keep your high-efficiency gas furnace running with these 3 easy furnace repairs (Bonus: 2 repairs that you should never attempt on your own).
You might also like: TBD
- Time
- Complexity
- Cost
- A total mean solar day
- Beginner
- $51–100
Salve $200 in fifteen minutes
Loftier-efficiency (92 percent and higher) condensing gas furnaces are circuitous. They accept multiple sensors and condom systems, all run by a computer. Some of the components are circuitous in themselves and require special equipment to diagnose and repair. But other parts are pretty straightforward and like shooting fish in a barrel to replace.
We talked to the experts at Superior Heating, Air Conditioning & Electric in Anoka, Minn., to get the lowdown on which furnace issues generate the most service calls, which of those repairs tin be performed by a DIYer and which ones are "pro just." It turns out that most of the issues are caused past a clogged furnace filter or any of iii easy-to-fix parts—the igniter, the flame sensor and the furnace loftier-limit switch.
If you're willing to risk $120 and buy all three parts ahead of time, you may be able to fix your own furnace in less than an hour and relieve a $125 service call. If the parts don't fix the problem, at least you've replaced the virtually probable suspects before calling the pros.
We'll prove yous what the parts look like and where they're installed on a typical furnace. But every furnace brand is different. And so your all-time bet is to find a service transmission for your particular furnace online. We call up these repairs are relatively like shooting fish in a barrel for a DIYer, but if you lot experience uncomfortable with any of the steps we show here, phone call a pro.
Figure A: Where The Parts Are
High-efficiency furnaces are jam-packed with valves, sensors, motors and flue pipes. We've removed many of those larger components from this furnace and so yous tin come across what the parts look similar and where they're located. They won't be as like shooting fish in a barrel to run into in your furnace. Hither are some tips to aid you observe the igniter, flame sensor, furnace high-limit switch and gas furnace force per unit area switch tubing.
The igniter and flame sensor are located inside a sealed combustion chamber and aren't normally visible. But they tin can be replaced without removing the combustion chamber encompass. If y'all don't have a service manual showing their location, consult the furnace-wiring diagram to place the wire colors for the igniter and flame sensor. To locate the sealed combustion chamber, follow the gas piping from the gas valve to a box with a cover and an inspection window. Then look for the wires going to the igniter and flame sensor. The high-limit switch is usually located below the sealed combustion chamber. The furnace force per unit area switch will always have flexible tubing running to it.
Before you first
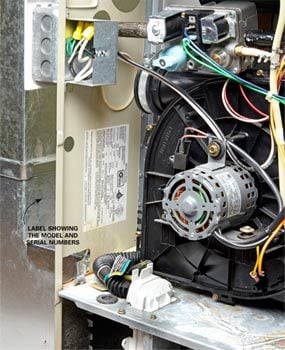
Photo one: Detect model and series numbers
Yank off the furnace covers and inspect the side panels in the burner surface area to notice the manufacturer's label. Write downwardly (or shoot a cell phone photo) of the model number, serial number and date of manufacture.
The igniter and the flame sensor are like tires on your car—they wear out every iv to 5 years. And then it makes sense to keep spares on paw. Igniters and flame sensors price about $50 each at apparatus parts stores and furnace dealers. Or y'all can detect them for less online. Just first yous'll need the make, model number and serial number of your furnace. Find all that data on the manufacturer's label (Photo 1).
So contact an authorized furnace dealer or visit a local appliance parts shop and buy the parts. Some furnace dealers won't give out parts numbers or sell parts to DIYers. And appliance parts stores don't always stock parts for every brand. In that example, search the Internet for "furnace parts" and enter your furnace make and model number to find the right parts (theignitorstore.com is one source).
Shut Off The Power!
All furnaces have a power cutoff switch inside the blower compartment that disconnects power to the furnace controls when the front panel is removed. Merely there'south still power coming into the furnace, then always turn off the furnace power at the switch on the side of the furnace and at the excursion breaker panel before disconnecting any wires, or testing/replacing whatever parts. And never run the furnace with the front console off.
Cheque the power, then the filter
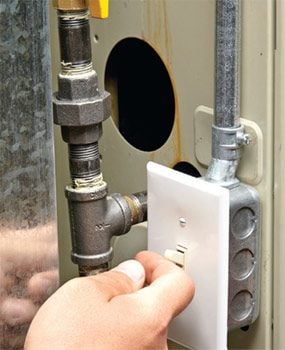
Photo 2: Perform a furnace reset
Flip the furnace power switch to off and look for at least five minutes. Then turn on the power and let the furnace restart.

Photo 3: Test the high-limit switch
Disconnect the wires going to the high-limit switch and connect a continuity tester to the switch terminals. If the exam light doesn't glow, the switch is bad.
Repair experts tell us that they often bear witness up at a residence only to detect that the unit isn't getting power because of a tripped breaker or a flipped furnace switch. And then check that first. Flip the switch on the side of your furnace, and flip the billow off and on again before you fifty-fifty remember nigh replacing any parts.
Next, check the filter. A clogged air filter restricts airflow through the oestrus exchanger, causing the furnace to overheat. The high-limit switch detects the dangerous overheating and signals the computer to shut off the burners and run the blower fan to cool off the heat exchanger. In one case the furnace cools, the computer tries to burn upwardly again. Simply if the filter remains clogged and the furnace overheats iv or more times (the actual number varies by manufacturer), the reckoner will shut down the furnace until it'due south repaired.
If the filter is filthy, yous've most likely discovered the cause of the shutdown. Replace it with a new one. Then reset the furnace (Photo 2). If the furnace won't restart, the repeated overheating may have damaged the loftier-limit switch. Consult the wiring diagram on the furnace door or your service manual to observe its location. And then test it (Photograph iii). If the switch is bad, remove the retaining screws and pull it out of the heat exchanger, noting the position of the sensor. Install the new switch with the sensor facing as information technology was.
Leave These Repairs to the Pros
Replacing an inducer fan motor looks similar a uncomplicated chore. But the fan requires special sealants and procedures to ensure it doesn't leak any carbon monoxide into your home. Screw this up and y'all could kill somebody. Leave this 1 to the pros.
Replacing a gas valve isn't difficult—it just screws into place. But you tin't install a new one without calibrating it to your dwelling's gas pressure and your furnace specifications. And that's going to require a service call from a trained expert with the proper equipment. Don't call back you'll save money past slapping one in yourself and skipping the calibration, considering improper calibration can burn upwards your heat exchanger, fill it with soot, stitch your gas bill or all of the higher up.
Video: half-dozen Tips for Furnace Troubleshooting
Replacing the igniter and flame sensor
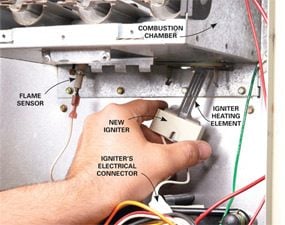
Photo 4: Install the new igniter
Slide the new igniter into position, avoiding contact with skin and hard surfaces. Then secure the role with a screw or snap connectors. Plug the igniter's electrical connector into the furnace wiring harness.
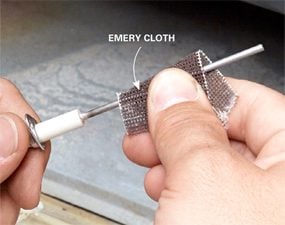
Photo 5: Clean off the crud
Apply low-cal pressure and scrub off any buildup or corrosion from the sensor with emery material or No. 0000 steel wool.
Near high-efficiency furnaces employ a "hot surface" igniter that heats upwardly to 1,800 degrees F to light the burners. Once lit, the burners then estrus a flame sensor. The furnace'due south computer uses the signal from the flame sensor to confirm a successful ignition and plough off the igniter. However, over time, the constant heat/cool cycles cause the igniter to crack and fail. And the flame sensor can develop surface corrosion, causing it to ship an incorrect signal to the estimator. Or information technology can simply wear out.
The igniter tin be held in place either by screws or by a snap-clip organization. Utilise a lighted flexible mirror to detect the method used on your furnace. Then remove the screws or unsnap the retainer and remove the old igniter. Utilize care when y'all install the new igniter—it'due south brittle and can crevice or shatter easily (Photo 4).
Next, remove the flame sensor. If the sensor element is covered with corrosion and you don't listen replacing the sensor later, you can try cleaning information technology (Photo 5). Otherwise, just replace it.
I last preventive measure
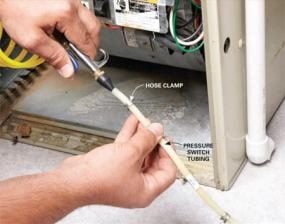
Photo 6: Clear the pressure switch tubing
Connect a compressed air gun to ane end of the tubing and aim the other end toward the flooring. Blow out each tube and reinstall.
Condensing gas furnaces attain their efficiency past extracting h2o from the exhaust gases. Sometimes condensation from that exhaust can form in the force per unit area switch tubing. This silicone tubing runs between the flue and the heat exchanger and the safety furnace pressure switch. Experts tell us they ordinarily remove those tubes and blow them out with compressed air as a preventive measure (Photo 6).
Required Tools for this Furnace Force per unit area Switch Project
Take the necessary tools for this DIY project lined up before you start—you'll salvage time and frustration.
Required Materials for this Project
Avoid terminal-minute shopping trips by having all your materials ready alee of fourth dimension. Here's a list.
Do yous accept a room that's a little colder in the Winter or warmer in the Summer? Bank check out this simple blower speed furnace boost trick.
Originally Published: September 30, 2019
Source: https://www.familyhandyman.com/project/3-easy-furnace-repairs/
0 Response to "what parts to keep on hand for your furnace"
Post a Comment